NGO+ explained
1. board
The board is simply a white board connected to the Internet. You can post a message of the day, an announcement, a birthday wish, etc. whatever you like.
The advantage of an internet board is that anyone can see it – not just those in an email list of whatsapp group.
After editing and saving the board, there is an option to send the board content as an email to each of your volunteers.
2. schedule
The schedule is the main function of NGO+. Here you can manage your volunteers in shift times and assign them to your tasks.
Each schedule is composed of groups or `shift times` and each group contains jobs. Groups are simply containers. A group can be a shift like `morning shift` or a place like `kitchen`, `field team`, etc.
The job is what volunteers sign up for. A job is a task like `kitchen helper`, `shift leader`, `cook` or whatever else there is to do.
2.1 info
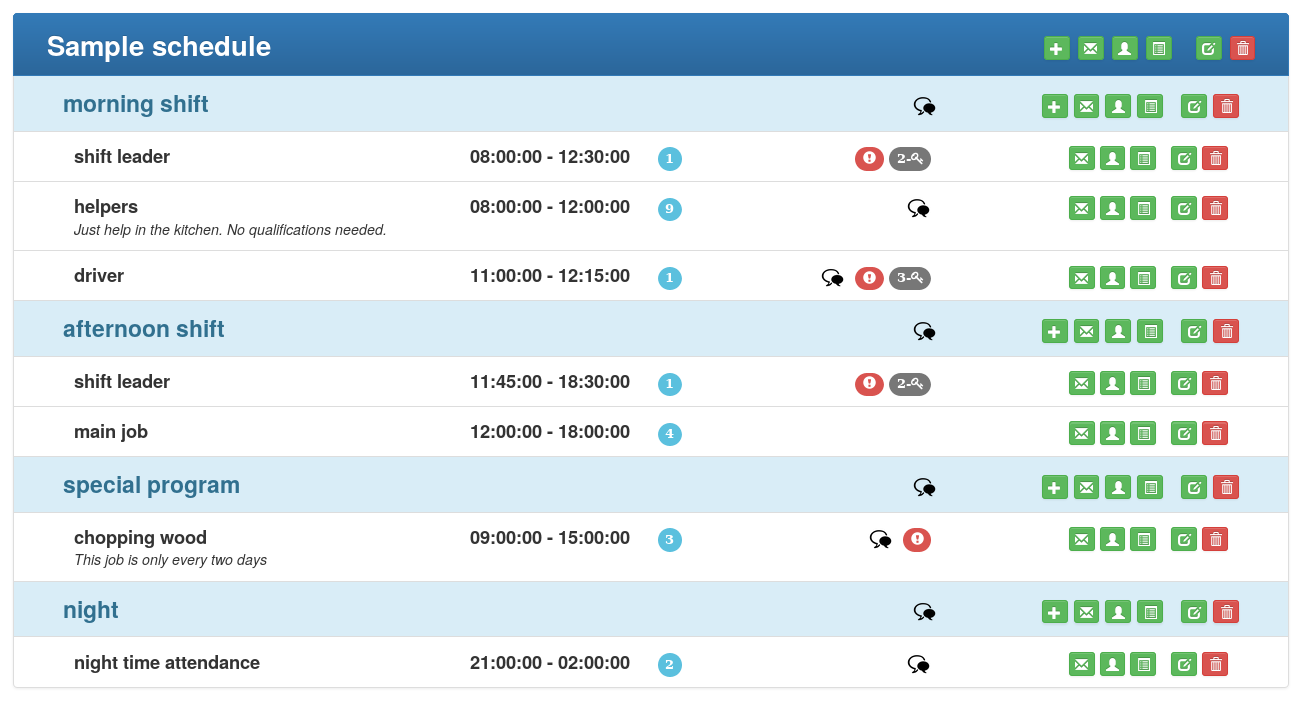
The info view shows the general information about the schedule. It lists the shifts and jobs with their times and a description at the bottom.
2.2 shift view
Shift with two jobs
The shift view shows the groups with their corresponding jobs together.
The light blue icon on the right shows the total number of volunteers needed. The icon and the icon are for administration (see below).
The icon shows the sign-up method (see sign-up method ).
The green icon with the plus sign shows the number of free seats left. When the number of volunteer needed is reached, volunteers can still sign up but the icon changes to indicate that there are enough people for that job there. That helps load balancing.
The red icon indicates that the job is restricted.
2.3 sign up
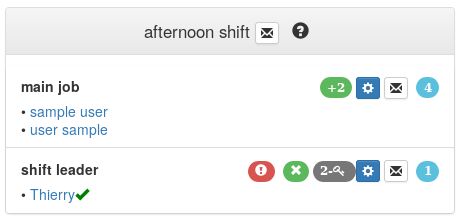
Volunteers can sign up directly for a job by themselves or the coordinators (admins) can assign volunteers to a job.
To sign up volunteers as a coordinator, click the , choose the volunteers and then save the changes.
2.4 job view
Job view lists only the jobs, not the groups. On large displays the jobs are positioned to show their starting time and their duration. On small screens the time scale is not shown.
2.5 me
The `me` tab lists the jobs the volunteer has signed up for.
3. forum
Each of the three – job, group, and schedule – can have their own attached forum where stuff can be discussed. E.g. If you have a job `cooks` you have a forum for the cooks where the cooks can discuss the cooking ...
To add a forum, select the checkbox `.. has forum`. The forum, too, can be restricted so only those in the list have access. However, there is only one user list per job/group/schedule entry. You cannot allow a selection of people to sign up and another selection to use the attached forum. The access list is always for both.
If you want a separate forum you have to create an extra group or job with forum but without a schedule (see next).
3.1 forum only
If you want a forum that is not related to a specific job or group, just create a new group/job and deselect the `has schedule` option. The entry will then act as a forum only.
4. coordinator menu
As a coordinator you have an extra menu with additional functions.
To edit a schedule and set the different parameters go to manage > manage. There you can set access rights, calendar and forum for each group (see later).
4.1 calendar
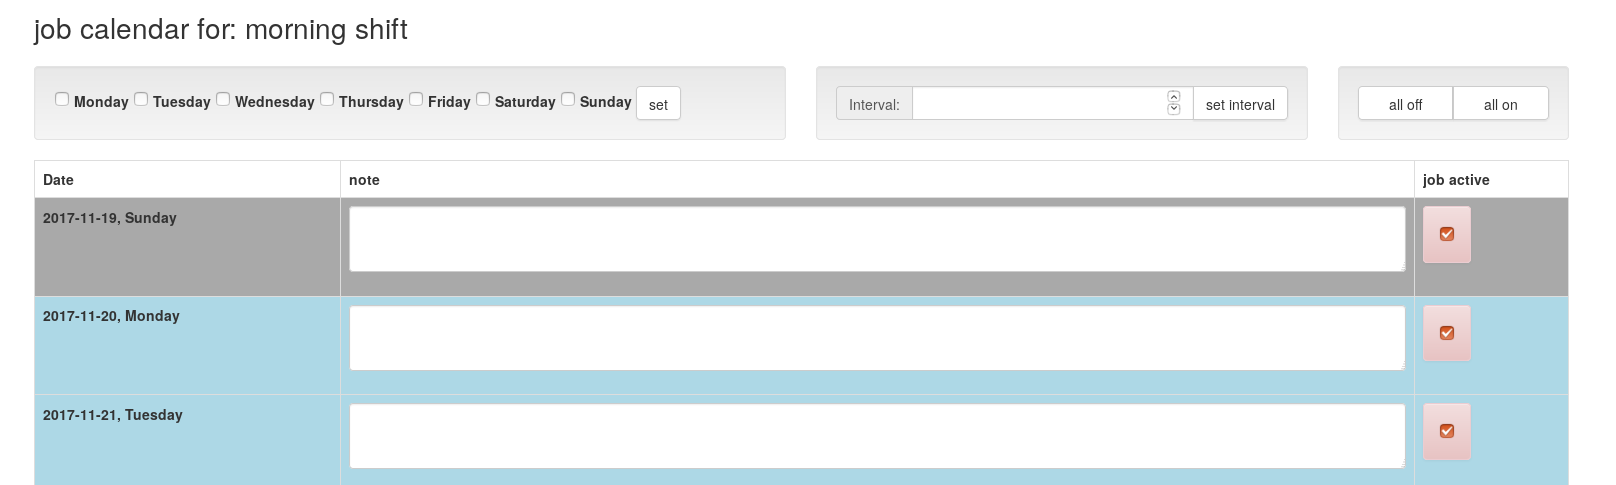
Not every task or job is daily. In that case use the calender function to set the exact dates when the job/shift occurs.
First, click 'all off' on the right side. Then choose one or more days of the week (on the left) or set an interval, e.g. every 3 days (in the middle).
If you set an interval the first day is always today.
You can also directly set the days on and off by clicking the red button in the `job active` column.
The calendar also has a field `note` for a message of the day.
After setting dates on and off and adding notes, you have to save the changes or the changes are lost.
4.2 member lists and access rights
For each, schedule, group and job you can restrict access to a selected group of people. If you restrict access rights for a job, only those with access rights for this job can sign up for the job. If you set restricted access for a group, the entire group is rerstricted, i.e. all jobs within the group are restricted. If you restrict access on the schedule level, the entire schedule is restricted.
The listed volunteers you see after clicking the icon in shift view or job view are those of your organisation. If you restrict access, only the members are shown.
NB: The access rights propagate upwards, i.e. if you grand access rights to someone on the job level, she will also have access to the group and to the schedule. On the other hand, if someone has only access rights for the schedule but the job is restricted, too, he will not be able to sign up for this job.
4.3 sign-up method
Usually volunteers just sign up for a job and that's it. But some jobs are important and you want to ensure attendance. For that there is the two-way and three-way sign up method. In the 2-way sign up method there is an approval needed by the coordinator: The volunteer signs up for the shift but only after approval by the coordinator the shift is set. This is useful for shift leaders, etc.
If you have a mission critical job like a driver, then you can use the 3-way sign up method. In this case the volunteer has to confirm the job after approval, i.e. there is selection, approval by coordinator and confirmation by volunteer. That should assure that attendance is guaranteed.
4.4 send emails
Wherever you see the icon you can send emails. In manage > manage you can send mails to all the members, i.e. if you click the mail icon of a job, you send mails to all members of this job. If you click the mail icon of a group, you send a mail to all members of the group and if you click the mail icon of the schedule, you send mails to all members of the entire schedule.
If you click the mail icon in the group view or in shift view (the actual schedule) mails will only send mails to those that are listed as active, those that you see on screen. Just try it out, it creates a new email but does not send it.
If you want to send mails to all your volunteers or to a selected group, go to manage manage > volunteers. Use 'send email to all' or 'send email to marked' respectively.Even if you do not limit access you can use the member lists to send mails. Click the envelope icon on schedule, group or job and it will open an new email with all members selected.
4.5 invisible
When you restrict a job or shift, you might want to hide it completely from those who don't have access. In that case use invisible and the job/group is only seen by those with access rights.
5. volunteers
Under manage > volunteers you see all the volunteers of your organisation. A volunteer of your organisation is a volunteer that has chosen your organisation in his/her settings. Of course, the volunteer has to be sign up in Greecevol.
6. admin rights
Under manage > admin rights you can set admins for NGO+. Admins can edit schedules, create new ones, change the board, add and remove volunteers from the schedule, etc.
Admins do not see and do not have access to the `admin rights` panel. That is only accessible for the root admin, i.e. the user that posted the the organisation on Greecevol.info. If you need a change in NGO+ root admin, send us a mail.
7. Ticket creator
The ticket creator is a simple tool to create tickets for a queue.
The concept of the queue is that the people queueing are grouped. The ticket uses two group identifiers:
A Roman numeral, e.g. I, II, III, IV, etc. for the main group.
A Latin uppercase letter, e.g. A, B, C, D, etc. for the subgroup.

In the sample above, the main group is I and the subgroup is B.
The system numerates the tickets from I-A to I-Z, then II-A to II-Z, etc. There are always 26 subgroups in each main group (A-Z == 26).
Each subgroup contains the number of people that has been chosen under Number of people per group. Eg. When the number of people per group is 7, there are seven tickets I-A, seven tickets I-B, etc.
The idea behind the groups is to announce the group plus subgroup on a white board. By that the queue is reduced to the number of people per group.
Example: food for 500 people.
-
Create groups of 15 people per group. Tickets will span from I-A to II-H.
-
Call group I-A, maximum 15 people have access
-
everyone with A-I ticket gets a meal
-
When A-I group is done, call I-B, etc.
You can use the I- (Roman I) for women and II for men. Or you can print an extra butch for a priority group. The tool let's you choose an individual, unique icon (to make fakes more difficult) or – for quick and dirty use – a symbol (not both, however).
Please send us feedback if you use the system.